0

ACCESS for ELLs Testing Guidelines & Tips

It’s that time of year again! This time I decided to break this down in order of needing to be completed as a sort of checklist to ensure that all of my ducks are in a row for our annual ACCESS Testing. In Missouri, the ACCESS for ELLs Testing window is always January through February. Over 39 states utilize this specific English proficiency exam, including Guam. Any new students that enter our school during this time must be given the online WIDA Screener to assess their current English knowledge, as well as take the annual ACCESS Test. Every student considered an English Learner is given the WIDA ACCESS Test every year until they’ve proved proficiency. (Which in Missouri that could be a 4.7 out of 6 or higher).

Image result for wida consortium

For those of you not in the ELL/ESL Department, the WIDA ACCESS 2.0 for ELLs Test is the annual English proficiency exam given to each student considered an English Language Learner. (WIDA is the name of test consortium company based out of Wisconsin). Thus meaning another language is spoken at home or came prior to learning English. English Learners may be working towards becoming bilingual or already know four other languages. It really depends on where in the world they are from and where they have been in their short lives. The WIDA ACCESS 2.0 for ELLs Test assesses English Learners on their Listening, Reading, Writing, and Speaking skills in English. The test is given at that student’s grade level, not current English proficiency or IQ level. The purpose of this test’s results is to show the English proficiency of English Learners among those four domains and comparing their proficiency to that of a native English speaker.

Image result for wida consortium

1-2 months Prior to Testing:

  • Reserve testing space and needed laptops (Computer Lab, Makerspace, or Library)
    • Media Specialist can help make this happen
  • Test in a large space with at least 10 computers
  • Ask District EL Dept for extra headsets, if needed…Media has plenty of mice 

1 month Prior:

  • Complete IEP/504 Accommodations forms (Check with SpEd & EL Dept)
  • Send out Parent Letter (from EL Dept)
  • Bi-monthly EL Parent Tea/Meeting about ACCESS test, expectations, scores, and available practices
  • Practice using headsets & microphones…hook up to iPad or laptops for lessons
  • Organize initial testing groups and Listening/ Reading test times
    • Check for special events, trainings, meetings, and no school days in advance
    • Consider SpEd, Speech, and EEE schedules
  • Inventory testing materials (laptops, headsets, & mice)

Testing Begins:

  • Store ACCESS materials in the original box in locked closet.
  • Don’t throw away any papers from the ACCESS material box. You will send them all back to District office to be shredded.
  • Email general testing info to staff including start dates and times
    • Update staff as changes occur and more scheduling takes place
    • Make sure SpEd, Speech, and EEE are aware 😊
  • Print Listening/Reading tickets
    • Triple check rosters for extra names, email EL Dept about students that have moved
  • Spend 1st week back practicing the test with laptops and headsets.
  • Set up room for TEST MODE
    • Bring in extra table/desks if needed, gather test laptops, headsets, “Shh Testing” signs
  • Check headphones and microphones with ALL laptops IN ADVANCE

Listening and Reading:

  • Listening and Reading can be mixed grades!!!
  • Log students into their laptop and test for attendance, security and timely log-ins
    • ACCESS Test log-in info is on the individual’s test tickets that you print.
  • Scratch paper is provided

Tiers:

  • Must complete Listening AND Reading to be placed in tier for 2nd half of test
  • Pre-A and A tests alone….Beginners test at tier A
  • B/C can test together

Writing:

  • Provide more time for 4th-5th Writing
  • 1st-3rd must be by tier and grade OR spread apart in large space (writing test booklets)
  • 1st-3rd have writing test booklets, 4th+ type writing
  • Scratch paper can be used, but sent with test materials

Speaking:

  • Test no more than 5 students at a time
  • EL Dept will send a person to administer the speaking tests, but I always have them finished before then.
  • Students give answer regardless to move on
  • CAN’T restart or re-record answer
    • Not penalized for not finishing. Checking English, not answer.
  • You CAN hit “Pause Test”
  • NO paper provided! 

Post Test:

  • Receive scores in May
    • Make a copy of scores to place in EL Student Files, send other copy home
  • Share scores at EL Parent Tea End of Year Celebration


REMINDERS:

  • CAN rephrase, explain, or translate directions and clarify tools
  • ONLY IEP kids get directions repeated (part of accommodations)
  • CAN’T help with translating answers
  • Can resume a timed out test on same day
  • Everything is at grade level, not IQ level.
  • ALL kindergarten tests are given by an outside ELL teacher, but you need to organize the materials and secure testing place(s).
    • Team brings their own equipment, you provide writing test booklets
  • I can add new students in WIDA-AMS!
  • Only test kids leaving USA if they are coming back at some point or parents request score

Recommended Times*:

Listening: 40 minutes                                Reading: 35-45 minutes

Speaking: 35-50 minutes                                 Writing: 65 minutes

*This test is not timed, but when scheduling these recommendations are helpful to know how much time to allow for each testing block.

0

It’s All Fun in Literacy Games

This isn’t necessarily true. I’m sure you can find some literacy games that kids don’t even want to touch. While other literacy activities, you can hardly get the kids to put them down. It can be an additional challenge to locate great learning activities, prep them, teach them to your students, and keep them organized. (As well as making sure everyone is engaged). 

Although that is an added benefit of utilizing learning activities and games in the classroom setting–to ensure all students have access to the learning and are engaged in the activity. Once literacy games are purchased or created, the goal is also that there is minimal teacher preparations for playing the game in the future. As a specialist that sees over 40 students a day, the less preparations I have to make in a day the better. These literacy games can be selected and modified to tailor the needs of your students wherever they are. There should also be the potential that students could lead the activity. Thus further promoting everyone’s participation and engagement. (A win-win!)

But first some research as to why the use of literacy games in language learning is effective and appropriate. Robert Marzano, education researcher and founder of Standards Referenced Grading, believes in learning games to boost student engagement and comprehension (Ferlazzo & Hull-Sypnieski, 2018, p. 227). Learning activities also tend to generate intrinsic motivation, as students are engaged in their own voice and learning. Literacy games and learning activities allow students to demonstrate knowledge of word relationships and language comprehension through the four areas of language learning. Listening (L), Reading (R), Writing (W), and Speaking (S) skills are the basis of learning any language, and the focus of ELL classes. Stephen Krashen, literacy researcher, found that learning activities helps to lower the “affective filter,” which reduces anxiety. The lower the affective filter is, the easier it is for students to learn a new language (Ferlazzo & Hull-Sypnieski, 2018, p. 327). The use of literacy games and learning activities gives students access to language and communication in a way that isn’t always readily available to them. Learning games allow students to learn rules to new games, turn taking, and social behaviors not regularly addressed through regular education. These games and activities help to break down difficult barriers and boost social skills and interactions with peers.

Literacy learning activities also help to ease the stress of language learning and unknown language barriers between diverse peers and early learners. Many newcomers and early learners are quite shy, so starting off with some of these learning activities begins to open up what the student knows as well as make them feel more comfortable in this new, positive learning environment.

BINGO Games  [All Lakeshore Learning products] (Bingo requires students to LRS)

  • Alphabet Bingo
  • Picture Word Bingo
  • Rhyming Bingo
  • Beginning Sounds Bingo
  • Blending Words Bingo
  • Sound Matching Bingo
  • Sound Switching Bingo

Bingo literacy games allows students to listen, read, and speak in English. Many of these games are compromised of actual pictures of the objects being asked to find, as well as the word included in each Bingo space.

Literacy Games

  • Ready to Write Prompt Box  [Lakeshore Learning] (RW)
  • Pop & Match Beginning Sounds Game  [Lakeshore Learning] (RWS)
  • Can Do! Reading Sight Words Game  [Lakeshore Learning] (RS)
  • Wrap Around Vocabulary Games  [Lakeshore Learning] (LRS)
  • Alphabet Picture Blocks  [Lakeshore Learning] (RS)
  • Colors and Shapes Matching Card Games (RS)
  • Rory’s Story Cubes (SW)

Literacy games are not something used in the ELL or regular education classroom everyday. These activities may be used as a warm-up, along with a lesson, guided practice, or as  Fun Day Friday activity to celebrate a week’s worth of learning.


Resources: Ferlazzo, L., & Hull-Sypnieski, K. (2018). The Ell teachers toolbox: hundreds of practical ideas to support your students. San Francisco, CA: Jossey-Bass.

0

Interactive Social Games

Integrating social and speaking skills in a fast paced, interactive, card game called Happy Salmon. I bought this random interactive card game when the Toys’R Us store in town was going out of business. It didn’t say much on the outside other than a “fin-slapping” good time that requires players to talk and interact with each other. This silly game makes players high five, pound it👊🏼, switcheroo, or happy salmon with a partner. When players have matching cards, they are to complete the quick action together. Clearly it’s very fast paced, talkative, and loud. The kids love it and it gets them talking and reading!⁣

This is a great way to work on social and speaking skills using simple phrases and action with peers. Students have to read and complete the phrase in order to move onto their next card. The person to compete all their task cards first wins! (By the time we recorded this, I had beat the students twice already). We are still working on being a good loser when it comes to games.

https://www.instagram.com/p/B53l2EeBaVd/?utm_source=ig_web_copy_link

0

Teachers on Social Media

The Teacher Twitter craze took over at least 6 years ago now. All the teachers in our district got excited about staying connected and sharing learning through Twitter. Schools created Twitter accounts and then teachers, specialists, and some high school students got involved to connect with teachers through (what could be used as) an academic community as well as a way to network with people reading and interested in similar things as you. (Hence the predicted searches or #TrendingNow). 

This year the head of our EL Department told us that this is the “Year of Promoting Yourself.” Using social media to put yourself out there and what you are doing. A place to publicly celebrate a lesson, share a failure, an “ah-ha” moment, or just every day life as a teacher. It is up to us to shed light on what we do, advocate for ourselves, and advocate for our students. Together we came up with a hashtag (#CPSELbest) to use to connect our district with our diverse learners and to connect our department. Every EL teacher in our district now has a Twitter account to share their teachings with this cyber community.

As social media has become more popular, some teachers or PTA committees have created private Facebook pages to interact with their classroom families. Our school has a PTA page on Facebook as another place to share information and pictures of what’s going in the classrooms every day, special events, and all school announcements. Facebook has always been a tricky form of social media for teachers, most think, unless you separate accounts…separating your personal Facebook account from your teacher/professional account. This way you can easily keep your personal life private without nosey parents seeing your every move and thought. This is protection for you and possibly your sanity.

As Facebook has fallen to the way side for some, another more instant form of social media is Instagram. Instagram allows you to have multiple accounts for your various passions and social media desires. I currently have 3 different Instagram accounts. One for personal and beauty use, one for my photography hustle (@infinite_snapshots), and another for teaching (@lessonplansinlipstick). This is a tool I’ve been using more often than this typical blog, clearly, as it is more instant, quick, and easily accessible to more individuals. But I notice I’m not putting as many words into my social media posts or adding as much meat. Mostly because we are so used to a quick glance or quick share and scrolling on. (I’m guilty of this myself). So I’ve found myself at a bit of a crossroads as to which social media platform to utilize more. But I thought I’d share my ideas for using social media or how I wish to differentiate from the 3 platforms that I use (WordPress, Twitter, and Instagram).

Ms. D’s Professional Social Media Goals [thus far]:

  • For every tweet, make a matching Instagram post.
  • Detailed Instagram posts/stories require a WordPress blog.
  • Share resources, professional development, English testing tips, and organizational skills for ELL/ESL Teachers on blog.
  • Share and discuss arts integration (the benefits and how this leads students, specifically ELs, to success) 
  • Post videos of online read alouds of new books I add to my collection
  • Advocate for diverse learners and diversity awareness, in all aspects

https://www.instagram.com/p/B3Ptljzh-uV/?utm_source=ig_web_copy_link

0

Tweet Tweet

Want to see what this teacher is up to on a more frequent basis? Follow my new Twitter account @MsDasczynski . (I follow back.) I post snapshots, blurbs, and anecdotes about what’s going on and the darndest things that kids say.

I’m working on coming up with a catchy, but relative to myself and teaching, name for a teaching Instagram account. A lot of teachers use Instagram now to connect and share what they’re doing with other teachers in a more social aspect. Having a hard time coming up with a name as many great ones are already taken. Things to look forward to…

0

Where in the world is Ms.D?

After what seemed like a short summer vacation, we return once again to those tiled halls, colorful classrooms, and bubbly teacher’s lounges. School let out in good ol’ Missouri just before June. There was about 12 days off then summer school started.

This was my first time teaching summer school and I was placed at a different school. I took on the role of ELL Teacher at a new building, with new faces and two different schools combined within. I experienced a new demographic of ELL students than what I’m used to and was completely on my own for the 20 days. Summer school, at least at that school, wasn’t like anything I was used to. When I was little and attended the Summer Adventure School program, we did normal academia in the morning and the afternoon was filled with hands-on, creative electives that we chose. I took classes like LEGO Movie Making and Go Karts Plus, where we built our own go karts out of wood and raced them.

Summer school where I was back in June consisted of a lot of videos/movies, outdoor fitness, and fuse bead art. I was also in a setting where the regular ELL teacher mostly used the “push-in” method, where she stepped into the regular classrooms to assist students with their work. For me, and this summer school set-up, the “pull-out” method is my go-to. Most of the students were fluent and all the older students questioned their placement in ELL every single day. They were unaware of the great services they should have been receiving regularly. Perhaps, titles weren’t properly given to the students via ELL teacher or the students weren’t seen too often. Regardless, it made my experience challenging but also more rewarding. It gave me the confidence to come back in the Fall to my own classroom and finally take charge.

That’s right, my own classroom! It still hasn’t fully sunk in on my end, but I have happily taken over the ELL Teacher position at my (current) dream school. Now that I’m officially a teacher here, I don’t think I can refer to it as my dream school anymore. It still feels like a wondrous dream to me. My incredible mentor from the past 1.5 years retired after she finished out summer school here. I was left with a room filled with various curriculum boxes and activities to teach English to my newcomers and visiting scholars.

Another stepping stone I reached in July was starting my Master’s Degree. I’m working towards earning my Master’s in Teaching English as a Second Language PreK-12th through Western Governor’s University online. I almost finished with my first course on culture. The program was fairly easy to get into and is very straight-forward. So far so good!

It’s going to be a busy first year teaching but an incredible experience to say the least!

0

Graphic Organizers Galore!

If I can organize my thoughts, ideas, questions, feelings into graphics, then I’m all about it. Language learning is so much more enriching when pictures can be associated to word concepts. Sometimes it takes a short video clip to see the concept in motion or maybe an action that can be associated with the meaning of the word. All of these elements, whether used alone or in combination, help to further instill language and new terminology. 

We can talk all day about healthy foods and read about eating a rainbow of foods. But it doesn’t really help us if we only know a few of each colored food. I created this food color wheel to go along with our book from Reading A to Z, A Rainbow of Foods. I put up a picture of some colorful foods, we referenced our book and completed this healthy food wheel. This helped my students a lot with more ways to eat healthy and better snack choices. 

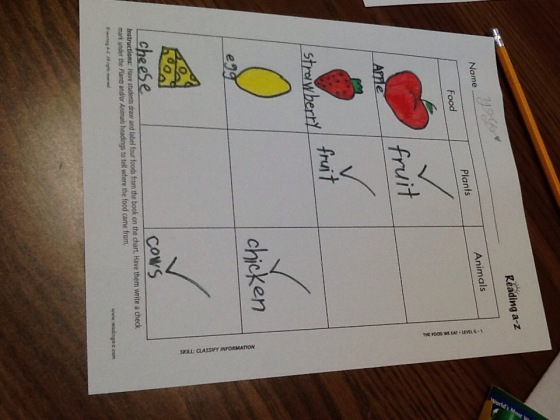
This organizer came straight from the Reading A to Z activities with the non-fiction text, The Foods We Eat. In this text we learned about where different foods come from and how they are made. Students had to brainstorm some of their favorite foods and figure out if they were plant eaters or meat eaters. Again associating a word with a picture and even a partial definition in this case with explaining the where. Some students took it a step further by telling where exactly their food came from.  

A story we read from the My Sidewalks on Reading Street collection had a similar picture that I drew up as a labeling activity. The book had this diagram at the end of the section for students to look over and read. I created this document for the students to physically label the plant parts between a flower and a vegetable. This activity was completed with first graders but can easily be modified for up to third grade, depending on how many parts you’d like to label.  

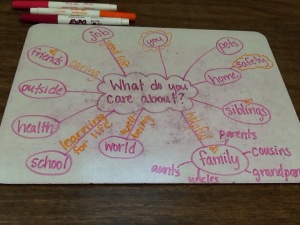
Not every graphic organizer has to include graphics. Sometimes just the movement and separation of words and phrases gives the visual or kinesthetic learner a different approach to understanding. This is where good old Venn diagrams,  t-charts, or KWL (know, want, learned) charts come in handy.

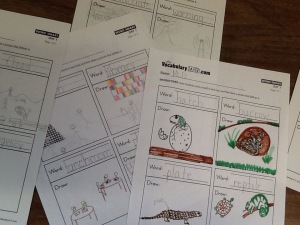
These types of graphic organizers are my absolute fave! They are so versatile and of course can be tailored to anyone’s needs. I first discovered them through Vocabulary A to Z, a branch of the Reading A to Z collection. Sometimes I choose the words to be defined and other times I make a list of vocab words for the students to pick the words they need a more clear understanding of. Students look up images on Google, our text, or from our discussions. For the more advanced students, we take our words and illustrations to the next level by writing a sentence about them.  

And then there are always more graphic organizers that are just more visually pleasing ways to share and keep track of information. Sometimes it’s good to physically see the connections between different things and how they correlate with like topics. Other times it’s good to make a timeline or number line to list out events in chronological order to get a grasp on time itself and the significance of events. 

Whatever works best for your students and you is something to take and run with.  My personal favorite is the vocab words with matching illustrations, which can be used across the board in various content areas and learning abilities.  I hope this blog will help you and your students to further develop language skills and comprehension overall. These are definetly big hits with my kiddos. 

0

Connecting Contractions

Sometimes we know what apostrophe’s are and sometimes we think they are commas that got away. But when it comes down to taking out a letter, or two or more, we throw that old friend in the air to signal that something is missing. When using contractions, we are taking two words and pushing them together as  concept can be easy to grasp but often times the students keep reading the contracted word as two separate words. When reading it’s, they are often saying it is. Sometimes when breaking things down we only make it that more confusing. So I like to take a few different approaches to concepts and grammatical tools to fully develop the thought process.  

When looking at contractions that end in “d” we are getting more difficult. Because many words end in “d” so it’s important to read through the whole sentence to understand where it’s going and which word will fit best. It’s also good to point out that you’re taking away way more than just 1-2 letters for these types of contractions. We practiced these choices more together to wrap our brains around these potential rule breakers. 

0

Actions Speak Louder Than (Other) Words

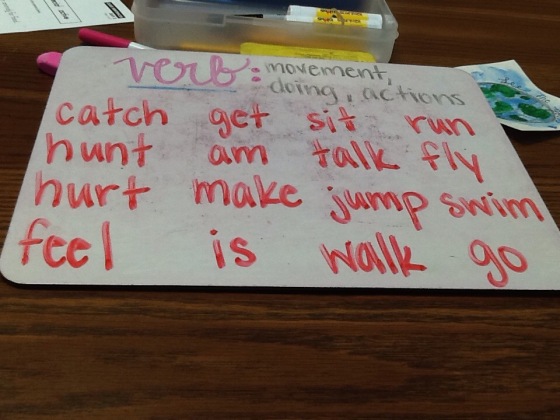
What are you doing right now? Thinking, writing/typing, sitting, breathing, blinking….those are verbs. Those action words that get us up and moving.those helping words that motivate and encourage us to build with ourselves and our words. 

Parts of speech are often left by the way side with ELL students because they are only learning in the United States for so long. But it’s also an important task to take on with any student who is fairly fluent with their writing and understand basic grammar and punctuation rules. It’s just good to know the difference between nouns and verbs. I usually don’t express that every sentence needs a subject noun and verb because that’s just beyond their reach at this point in their education. But knowing the difference between action words and people, places, things , and ideas are a terrific place to start adding to that learning curve and further develop their thinking. 


After brainstorming various verbs together, students worked on reading through sentences and deciphering which words are verbs. Many times we found ourselves asking questions like “who is doing what?” or “what is happening here?” These questions helped the students to read closer as to what actions are actually taking place in each sentence they read. Students then got to write a sentence of their own being conscious of their use of verbs as they go. Verb usage was never an issue before, other than subject verb agreements–but that’s an issue with most people learning a new language. It’s all a part of the learning process. 

0

Satisfying a Masterpiece

This creative art piece was created by all of our ELL students as a gift to our beloved ELL teacher that is retiring. The concepts were brought together by two fourth grade students. One had the idea of color where the other had ideas of clouds, land, and a dark circular void in the middle of it all. We were able to combine those ideas into a large scale stained glass window design. Using pieces of colored broken glass we began laying the ground works for our masterpiece. As the day went on, we got students from each grade level to join in with laying the glass.

Dr. Gennie is the real mastermind when it comes to creating stained glass art. She carefully showed each student the ropes of each step of the window design, the layout, glueing all the pieces, to the grout work, polishing the entire piece, and of course giving it a name. We assigned different tasks to each grade level. Our kindergarten friends helped name the masterpiece, “Piece by Peace.” Our first graders helped to shine and polish the beautiful work. Much of the glueing took place by the careful hands of our third and fourth graders.

Silicone is used to adhere the glass pieces to the window. We used Popsicle sticks to spread the silicone onto the glass then carefully place the pieces back in their rightful place on the window. It is a tedious task that our wonderful third and fourth graders excelled at. The next step is adding the grout in between the pieces of glass to really hold everything in. Once the grout is inserted, it’s time to polish the masterpiece and do the clean up work. Cleanup work had to be completed by teachers since you have to use x-acto knives to dig out excess grout and silicone. We used water and wool socks to shine the glass and clean the window frame.